This guide helps you use Chatwoot together with your AI Chatbot to manage guest conversations, monitor chatbot activity, and stay in control of all messages, across desktop and mobile.
By combining Chatwoot (conversation management) with AI chatbot, you get:
- Centralized guest conversations
- Clear visibility of AI chatbot vs human replies
- Better organization with labels and reports
- Full control from desktop and mobile
Below is a complete walkthrough of the key features you should use daily.

Searching Conversations with the Search Bar
As message volume grows, finding the right conversation fast becomes critical.
Use the Search Bar in Chatwoot to locate conversations by:
- Guest name
- Phone number
- Message content
- Reservation number / Booking ID
Why this matters:
- Quickly handle returning guests
- Review past issues or promises
- Verify what AI chatbot or your team already replied
Best practice:
- Always search before replying to avoid duplicate or conflicting responses.
- Use guests’ name, phone number, or reservation number / Booking ID in search to easily navigate through all the conversation, and faster.
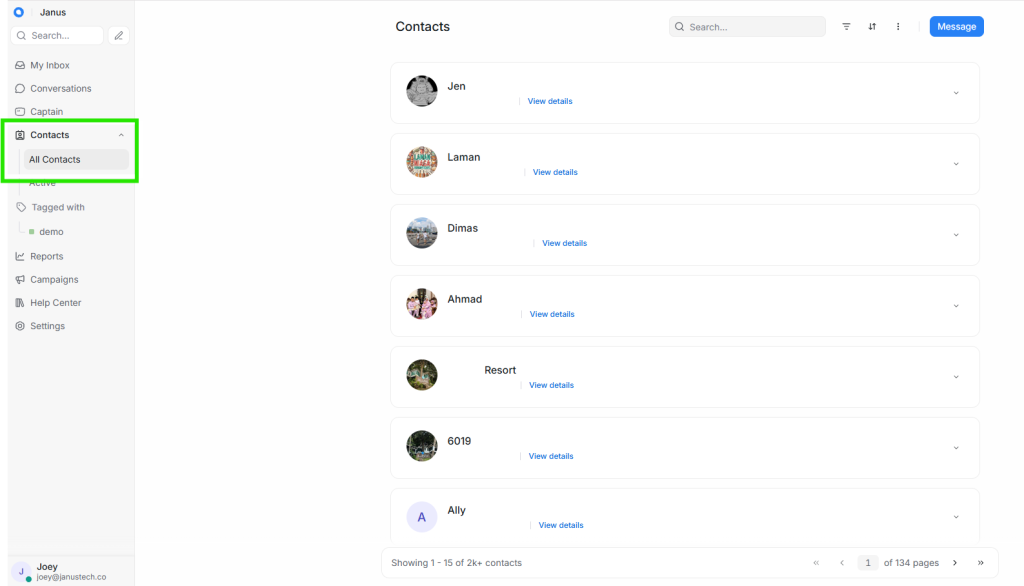
Viewing All Guest Contacts (Contacts Section)
The Contacts section shows every guest who has interacted with you, via WhatsApp, or web chat.
Here you can:
- See guest names and phone numbers
- Review conversation history per guest
- Track repeat guests
- Identify guests handled mostly by AI chatbot vs human agents
Why this matters:
- One guest = one profile, even across multiple conversations
- Easier follow-ups and continuity
- Better personalization over time
Tip: Treat Contacts as your guest CRM, not just a message list.
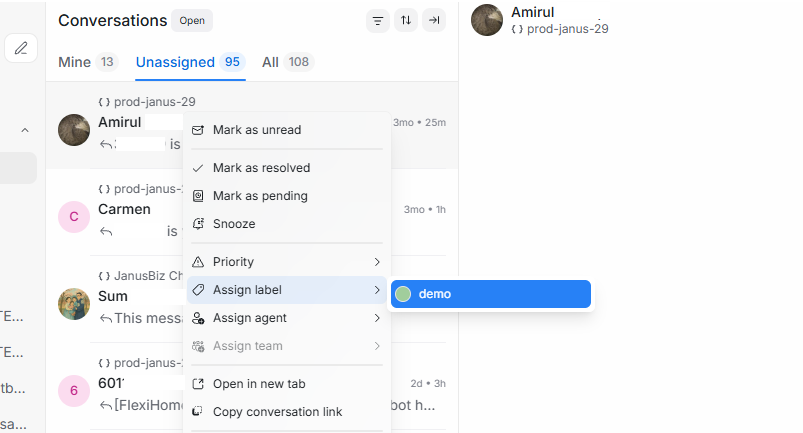
Setting Up Labels (Settings → Labels)
Labels help you organize conversations by status, intent, or priority.

To set the labels up, navigate to Chatwoot sidebar menu → Settings → Labels
Examples of useful labels:
Check-inPayment- Deposit paid
- Deposit refunded
UrgentNeed Human Follow-upResolved
How to use labels effectively:
- Agents can add/remove labels during conversations
- Combining labels with Filter conversations
- Reports can be filtered by labels later
Why this matters:
- Faster triage
- Cleaner reporting
- No more guessing which chats need attention

Viewing Chatbot API Channel (Settings → Inboxes)
Once your AI Chatbot is connected, it appears as a connected Inbox / API Channel.
In Settings → Inboxes, you can:
- See which inbox is connected to JANUS
- Verify the channel is active
Why this matters:
- Clear separation between automation and manual handling
- Easier debugging if replies fail
- Confidence that JANUS is actually “listening”
If messages stop auto-replying or AI chatbot not responding to any queries, this is the first place to check.

Understanding Reports (Reports Section)
Chatwoot reports give you visibility into performance, not guesses.
Available reports include:
1. Overview Report
- Open Conversations
- Agent status
- Conversation Traffic
- And much more
2. Conversations Report
- Open vs resolved conversations
- Conversation volume over time
- Peak message hours
3. Labels Report
- How many chats fall under each label
- Identify common guest issues (e.g. check-in confusion)
4. Inbox Report
- Performance per inbox
- AI chatbot inbox vs human-managed inbox
- Load distribution
Why this matters:
- Spot bottlenecks early
- Decide what AI chatbot should handle more
- Improve guest experience with data, not assumptions

Setting Up Profile Settings (Profile Settings)
Each user should properly configure their Profile Settings.
Key items to review:
- Profile Picture
- Your full name (account)
- Display name
- Your email address
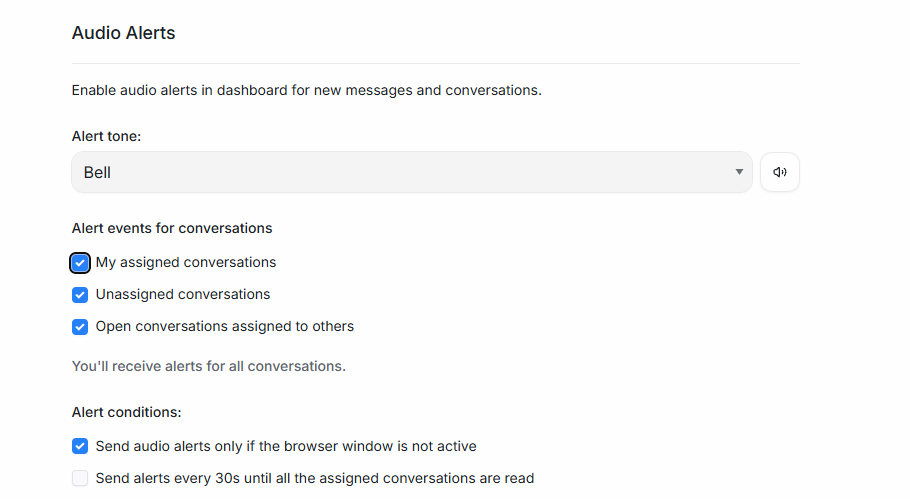
Configuring Alerts & Notifications (Profile Settings)
To avoid missing important messages, configure alerts properly.
Available Notification Options:
- Audio alerts
- Alert tone (choose any suitable / available alert sound)
- Alert event for conversation
- Alert conditions
- Notification preferences (mentions, assignments, all messages)
- Push notifications (mobile browser / installed app)
Recommended setup:
- Enable audio alerts during working hours
- Enable push notifications for assigned conversations
- Include Agents in each Inboxes connected. To do so:-
- Go to Settings > Inboxes
- Select Inboxes (API Channel) that connected to your Chatwoot account

-
- Navigate to Collaborators tab
- Pick agents for the inbox
- Enable auto assignment in Conversation Assignment
- Don’t forget to Update!


To make sure everything is in order, in browser settings, please check the Permissions settings, as using those configuration might need to enable some part of it. To learn more about thee detailed instruction, navigate to HERE (click here)
Don’t turn on everything, alert fatigue is real.

Using All Features on Mobile (Mobile Web App)
Good news: Chatwoot works fully on mobile browsers.
From your mobile browser, you can:
- View and reply to conversations
- Search chats
- Assign labels
- Check reports
- Receive notifications
- Monitor AI chatbot replies
Best supported browsers:
- Mozilla Firefox (Android)
- Mozilla Firefox (iOS)
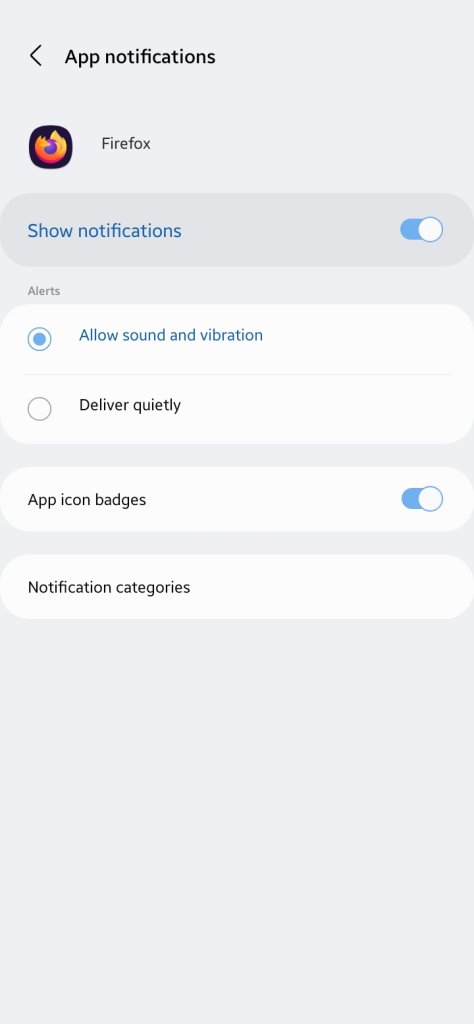
Don’t forget to enable notification in the browser app!

Also, check your phone’s App notifications too, just in case!
This makes Chatwoot + JANUS AI Chatbot usable even when:
- You’re offsite
- You’re on standby
- You don’t have laptop access
Installing Chatwoot as a Mobile App (PWA)
You don’t need App Store or Play Store.
Chatwoot supports Install as App via mobile browser.
How to install:
On Android (Chrome):
- Open Chatwoot URL
- Tap ⋮ menu
- Tap Add to Home Screen
- Confirm install
On iOS (Safari):
- Open Chatwoot URL
- Tap Share
- Tap Add to Home Screen
Once installed:
- Cleaner full-screen experience
- It behaves like a native app
- Faster access
- Better notification handling
- No need to install new / additional app from App Store